

We get it. Tie-dyeing is indeed much fun and never appears to walk-out style. But, just like when you tried to dye your wild hair purple at home, it could go wrong very quickly.
The tie-dye process is proof that there surely are several ways to earn a “green thumb” and let’s face it - your kiddos are “dyeing” to do it. And, truthfully, the mess may be worth the fun, especially if you’re trapped in quarantine and sociable distancing during COVID-19.
They’re likely to keep those t-shirts or pillowcases around for so long as possible and remember the giggle fits you had while tackling this fun job. Remember, you can always utilize your coloring options as an opportunity to teach some science also. (Unpopular opinion: It’s also a great time to teach your children how exactly to use the washing machine by themselves. Life skills moment!)
Tie-dyeing emerged and became a mainstay in pop culture found in the 1960s, however, the art is much older and meaningful. A mention of the process can be found in a 1941 book about the Philippines where users of the Bagobo tribe happen to be referred to as wearing “highly decorated outfits made of hemp fiber, all tied-and-dyed into elegant designs.”
The practice of this ancient tradition even goes back to Peru dating back to A.D. 500 to 800 but was also found in Japan, China, South Asia, and Africa.
With such a rich history behind it, that is a great way to have a blast and sneak in a brief history lesson to your children. Here’s how to start:
Prepping for Tie Dye
Prepping designed for tie-dye is simpler than you’d think. Always rinse your shirt (or any different material you’re dyeing) first and leave it somewhat damp for the process. Besides that, the most important matter to keep in mind is normally something you probably know: Dying is messy!
Try to dye outside or anticipate putting down a leak-evidence drop cloth. If you’re not working from a kit, you’ll want to be sure to have rubber gloves, elastic bands (or string), and a plastic material bag handy, as well. Do buy dye t-shirt for women.
Tie-Dye Patterns to Try
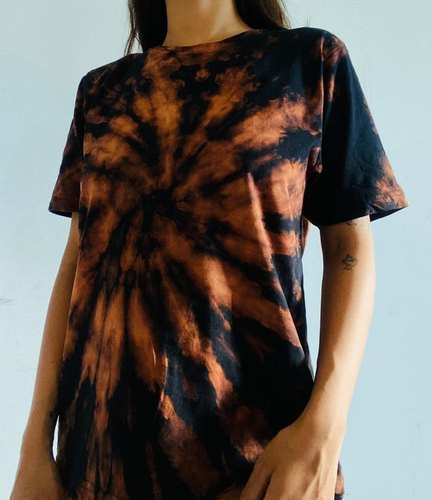
1. Spiral Dye
Decide where you wish the center of your spiral to end up being. Remember: No guideline says the center of your spiral must be in the center of your shirt. Once you find it, pinch the center and slowly twist your shirt. You’ll observe that as you twist/rotate, your t-shirt will gather and the wrinkles will look just like a spiral.
Hold twisting until your shirt is in a good circle. Secure with several rubber bands that overlap in the center. With the rubber bands set up, your shirt will look like a sliced pizza.
Make use of each “slice” as an instruction for where to put dye. You can put a diverse color on each slice (carry out the front and the trunk), stick to a color “family members” and pattern just 2-3 3 colors as well as just use one color.
2. Bull’s Eye
Decide where on your shirt you want the center of your bull’s vision and pinch your shirt there, picking it up seeing as you do. The others of your clothing will drape below. Secure an elastic band about an inch below your pinch.
Continue adding elastic bands further down your clothing, creating an extended tail. Squirt your clothing in your desired dye hues - this is another time when just using one color my work best.
3. Mini Bull’s Eyes
Rather than pinching once and creating a tail, with mini bull’s eyes, you’ll make several pinches on your shirt and secure them with a rubber band. You can create one-ring bull’s eyes only using one band for every pinch.
You could also put in a second band an inch before (or after) the 1st pinch/band to receive that peak bull’s eye appearance.
4. Crumple Method
If patterns aren’t your matter, try the crumple method. Only gather up your shirt in a wrinkled, crumpled mess, then secure it with rubber bands. Work with one color or a couple of colors that blend well together.
5. Heart-Shaped Pattern
Start by eliminating a heart condition on a bit of paper. Fold your t-shirt in two. Trace your heart on your shirt by using a washable marker, producing sure the seam of your heart is flush with the seam of your clothing.
Next, pleat your clothing along the line and suspend with a band. Add extra bands along the “tail” of your pleated shirt. Once you’ve secured your preferred bands, use dye to effectively soak each section in a favored color.
6. Shibori Tie Dye
Shibori is a brilliant cool Japanese design of tie-dye. The essential? Getting the shirt bound as firmly as possible and (typically) only using one color. Start by twisting your clothing lengthwise, as tightly as conceivable.
Consider it like you’re about to snap a towel at someone at the pool area. The tighter the better (read: more painful). Upcoming, roll your shirt right into a spiral, also rolling as tightly as possible, like when you roll a poster to place into a mailing tube.
Finally, protected with string, instead of elastic bands. Why string? Because it has significantly less give and you’re able to make it as restricted as humanly likely, without snapping it. Soak your shirt in the required dye of your choice, though navy is the typical option.
Learn more about checkered shirts here.
पागल शांत टाई डाई आदतें आपके बच्चों को पसंद आएंगी
अपना हाथ उठाएं यदि आपने कभी बहुत अच्छे इरादों के साथ टाई-डाई पैकेज खरीदा है और इसे 3 साल के लिए अपने कपड़े धोने के कमरे में बैठे छोड़ दिया है क्योंकि आपके पास गंदगी से निपटने की भावनात्मक क्षमता नहीं है ।
हम इसे प्राप्त करते हैं । टाई-डाइंग वास्तव में बहुत मजेदार है और कभी भी वॉक-आउट शैली में दिखाई नहीं देता है । लेकिन, ठीक उसी तरह जब आपने घर पर अपने जंगली बालों को बैंगनी रंग में रंगने की कोशिश की, तो यह बहुत जल्दी गलत हो सकता है ।
टाई-डाई प्रक्रिया इस बात का प्रमाण है कि निश्चित रूप से "ग्रीन थंब" कमाने के कई तरीके हैं और इसका सामना करते हैं - आपके किडोस इसे करने के लिए "रंगाई" कर रहे हैं । और, सच्चाई से, गड़बड़ मज़े के लायक हो सकती है, खासकर यदि आप कोविद -19 के दौरान संगरोध और मिलनसार दूरी में फंस गए हैं ।
वे उन टी-शर्ट या तकिए को यथासंभव लंबे समय तक रखने की संभावना रखते हैं और याद रखें कि इस मजेदार नौकरी से निपटने के दौरान आपके पास फिट बैठता है । याद रखें, आप हमेशा अपने रंग विकल्पों का उपयोग कुछ विज्ञान सिखाने के अवसर के रूप में भी कर सकते हैं । (अलोकप्रिय राय: अपने बच्चों को यह सिखाने के लिए भी एक अच्छा समय है कि वॉशिंग मशीन का उपयोग कैसे करें । जीवन कौशल पल!)
टाई-डाइंग उभरा और 1960 के दशक में पाई जाने वाली पॉप संस्कृति में एक मुख्य आधार बन गया, हालांकि, कला बहुत पुरानी और सार्थक है । इस प्रक्रिया का उल्लेख फिलीपींस के बारे में 1 9 41 की पुस्तक में पाया जा सकता है जहां बगोबो जनजाति के उपयोगकर्ताओं को "हेम्प फाइबर से बने अत्यधिक सजाए गए कपड़े पहनने के रूप में संदर्भित किया जाता है, सभी सुरुचिपूर्ण डिजाइनों में बंधे और रंगे हुए हैं । ”
इस प्राचीन परंपरा का अभ्यास भी पेरू में वापस चला जाता है 500 से 800 ईस्वी तक वापस डेटिंग लेकिन जापान, चीन, दक्षिण एशिया और अफ्रीका में भी पाया गया था ।
इसके पीछे इस तरह के एक समृद्ध इतिहास के साथ, कि एक विस्फोट किया है और अपने बच्चों के लिए एक संक्षिप्त इतिहास सबक में घुसने के लिए एक शानदार तरीका है । यहां जानिए कैसे शुरू करें:
के लिए Prepping टाई डाई
टाई-डाई के लिए डिज़ाइन किया गया प्रिपिंग आपके विचार से सरल है । हमेशा अपनी शर्ट (या किसी भी अलग सामग्री को आप रंगाई कर रहे हैं) को पहले रगड़ें और प्रक्रिया के लिए इसे कुछ हद तक नम छोड़ दें । इसके अलावा, ध्यान में रखने के लिए सबसे महत्वपूर्ण बात सामान्य रूप से कुछ है जिसे आप शायद जानते हैं: मरना गन्दा है!
बाहर डाई करने की कोशिश करें या रिसाव-सबूत ड्रॉप कपड़ा डालने का अनुमान लगाएं । यदि आप एक किट से काम नहीं कर रहे हैं, तो आप रबर के दस्ताने, इलास्टिक बैंड (या स्ट्रिंग), और एक प्लास्टिक सामग्री बैग के साथ-साथ काम करना सुनिश्चित करना चाहते हैं । महिलाओं के लिए डाई टी-शर्ट खरीदें ।
कोशिश करने के लिए टाई-डाई पैटर्न
1. सर्पिल डाई
तय करें कि आप अपने सर्पिल के केंद्र को कहां समाप्त करना चाहते हैं । याद रखें: कोई दिशानिर्देश नहीं कहता है कि आपके सर्पिल का केंद्र आपकी शर्ट के केंद्र में होना चाहिए । एक बार जब आप इसे पा लेते हैं, तो केंद्र को चुटकी लें और धीरे-धीरे अपनी शर्ट को घुमाएं । आप देखेंगे कि जैसे ही आप मोड़ते/घुमाते हैं, आपकी टी-शर्ट इकट्ठा हो जाएगी और झुर्रियाँ सर्पिल की तरह दिखेंगी ।
जब तक आपकी शर्ट एक अच्छे सर्कल में न हो, तब तक घुमाएं । केंद्र में ओवरलैप करने वाले कई रबर बैंड के साथ सुरक्षित । रबर बैंड की स्थापना के साथ, आपकी शर्ट एक कटा हुआ पिज्जा की तरह दिखाई देगी ।
डाई डालने के लिए निर्देश के रूप में प्रत्येक "स्लाइस" का उपयोग करें । आप प्रत्येक टुकड़ा पर एक विविध रंग डाल सकते हैं (सामने और ट्रंक बाहर ले जाने के लिए), एक रंग "परिवार के सदस्यों" और पैटर्न सिर्फ 2-3 3 रंग के साथ ही सिर्फ एक रंग का उपयोग करने के लिए छड़ी ।
2. बैल की आंख
तय जहां अपनी शर्ट पर आप अपने बैल की दृष्टि के केंद्र चाहते हैं और अपनी शर्ट वहाँ चुटकी, यह उठा देख के रूप में आप करते हैं । अपने कपड़ों के अन्य नीचे कपड़ा होगा. अपने चुटकी के नीचे एक इंच के बारे में एक लोचदार बैंड सुरक्षित करें ।
अपने कपड़ों के नीचे लोचदार बैंड जोड़ना जारी रखें, एक विस्तारित पूंछ बनाएं । अपने वांछित डाई रंगों में अपने कपड़ों को निचोड़ें - यह एक और समय है जब सिर्फ एक रंग का उपयोग करना मेरा काम सबसे अच्छा है ।
3. मिनी बैल की आंखें
मिनी बुल की आंखों के साथ एक बार चुटकी लेने और पूंछ बनाने के बजाय, आप अपनी शर्ट पर कई चुटकी बनाएंगे और उन्हें रबर बैंड के साथ सुरक्षित करेंगे । आप हर चुटकी के लिए केवल एक बैंड का उपयोग करके वन-रिंग बुल की आंखें बना सकते हैं ।
तुम भी एक दूसरे बैंड में डाल सकता है एक इंच से पहले (या बाद में) 1 चुटकी/बैंड कि चोटी बैल की आंख उपस्थिति प्राप्त करने के लिए.
4. क्रंपल विधि
यदि पैटर्न आपकी बात नहीं हैं, तो क्रंपल विधि का प्रयास करें । केवल अपनी शर्ट को झुर्रीदार, उखड़ी हुई गंदगी में इकट्ठा करें, फिर इसे रबर बैंड के साथ सुरक्षित करें । एक रंग या कुछ रंगों के साथ काम करें जो एक साथ अच्छी तरह से मिश्रण करते हैं ।
5. दिल के आकार का पैटर्न
थोड़ा सा कागज पर दिल की स्थिति को खत्म करके शुरू करें । अपनी टी-शर्ट को दो में मोड़ो। एक धोने योग्य मार्कर का उपयोग करके अपनी शर्ट पर अपने दिल का पता लगाएं, यह सुनिश्चित करें कि आपके दिल का सीम आपके कपड़ों के सीम के साथ फ्लश है ।
इसके बाद, अपने कपड़ों को लाइन के साथ फुलाएं और एक बैंड के साथ निलंबित करें । अपनी प्लीटेड शर्ट की "पूंछ" के साथ अतिरिक्त बैंड जोड़ें । एक बार जब आप अपने पसंदीदा बैंड सुरक्षित कर लेते हैं, तो प्रत्येक अनुभाग को एक पसंदीदा रंग में प्रभावी ढंग से भिगोने के लिए डाई का उपयोग करें ।
6. Shibori टाई डाई
शिबोरी टाई-डाई का एक शानदार शांत जापानी डिजाइन है । आवश्यक? शर्ट को यथासंभव मजबूती से बांधना और (आमतौर पर) केवल एक रंग का उपयोग करना । अपने कपड़ों को लंबाई में घुमाकर शुरू करें, जैसा कि कसकर बोधगम्य है ।
इस पर विचार करें जैसे आप पूल क्षेत्र में किसी पर एक तौलिया स्नैप करने वाले हैं । तंग बेहतर (पढ़ें: अधिक दर्दनाक)। आगामी, अपनी शर्ट को एक सर्पिल में रोल करें, जितना संभव हो उतना कसकर रोल करें, जैसे कि जब आप एक मेलिंग ट्यूब में जगह के लिए एक पोस्टर रोल करते हैं ।
अंत में, लोचदार बैंड के बजाय स्ट्रिंग के साथ संरक्षित । क्यों स्ट्रिंग? क्योंकि यह काफी कम दे दिया है और आप इसे तड़क के बिना, आदमियत की संभावना के रूप में प्रतिबंधित करने में सक्षम हैं । अपनी शर्ट को अपनी पसंद की आवश्यक डाई में भिगोएँ, हालांकि नौसेना विशिष्ट विकल्प है ।
चेकर शर्ट के बारे में यहाँ और जानें।


