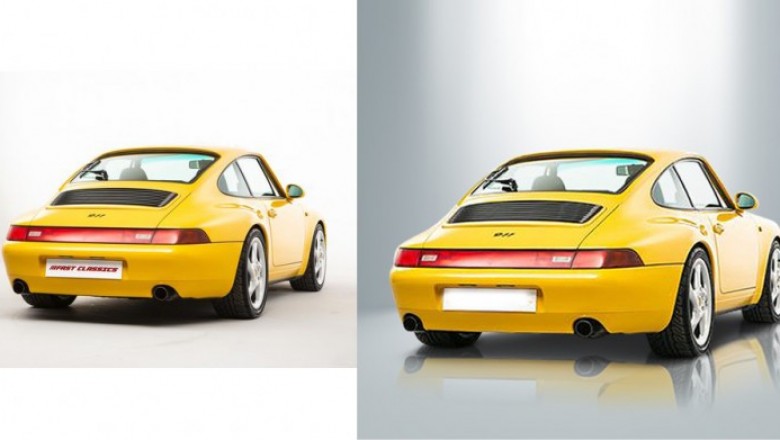
Car shadow service
hello everyone welcome back to the. background changes and we're going to use this Raptor that I shot the other.
day again two pictures that will be merged just. for the reflections and I guess we can just get started and we're going to select them both and edit them.
as layers in Photoshop. okay now that we're in Photoshop what. we're gonna do first I'm just bringing this
up we're going to do our normal select edit align layers okay select the top layer to create a mask and we're just gonna. brush back in the polarised section and we're just going to fix that. Slightly, okay that looks good.
so mmm just get all of it okay. that's fine okay. so now we're gonna do it we're gonna merge these layers now we have a nice polarized truck and I downloaded it. already three different pictures okay. so we're gonna use one of these three pictures and we need to figure out which one will mesh the best so just by.
looking at it this ground and this ground are pretty close to this one is. not that close and this ground is.
close so what I think I kind of. like the best is probably this one and. just for the sake of doing this, I'm just. gonna kind of get rid of these so now we. have a nice clean background. straightforward okay so what we're gonna do is we are going to desaturate the. a picture maybe about here and we're also. going to try and match the grass to this. so I guess this looks okay and then we'll just mask off this guy because. like the blue sky so we're gonna merge and we're going to just drag it. you know what I don't like that so let's just go back here let's just leave it. how it is for now and then we could. always fix it so what I'm going to do is.
just convert to normal air and we're. gonna bring it in and we'll fix it. everything else after we want to be. horizon line needs to be where it is. right there then we can adjust from here. a good way to also do this to bring the. opacity down just enough to see what's. going on and if we want to leave it here. and then just say we'll bring this up. right here should be okay and a. little bit more in the distance maybe. right here. okay and then what we're. gonna do it we're just gonna mask out so. just literally paint out the car then we. can go back in and I would go so just do. the whole this whole bottom because that. looks natural and lettering the. opacity back up and see what we have. okay not so bad. I think it looks pretty natural to be.
honest maybe just bring do a. Camera Raw filter not on this that's. just doing it on the mask went into an a.camera filter on the actual picture and. what I'm going to do in this HSL.adjustment saturation I'm just bringing the blue and the Aqua is down. that looks better a little bit more. natural and I could always adjust them. afterward but alright so this looks. pretty good what we're also this is not a hundred. percent what we're gonna also do now is just cut out the car so we're gonna use.
whatever is at the pen tool, come over here go to about here if you don't know-how. to use the pen tool. probably something that you should look up to and learn. because when you're doing background. changes and you want it to be precise so, say you want to make sure. that you have a good outline of the car so this way you're not just you know half-assing it so we're gonna bring this up maybe to that here and the reason why. we're cutting out the cars because we want the selection and the piece. to be accurately put so so basically. it's not gonna overlap with the car and. the shape and body of the car and everything will be normal we can bring. this here doesn't have to be absolutely perfect I mean the top of this. car is not perfect. perfect but it'll be enough to go off of and just do a rough selection around ith a pentool bring it down and. sometimes it's too far so you kind of just do half. way like this the mirror is usually the one of the.
harder parts not to select but to you. where to do this without the pen tool and you would have just do masking this. is the more difficult part to do okay.
and the pen tool using it just kind of comes with practice and repetition and you know the more that you do it the easier it will be it took me a long time to really perfect using it and even now, I still have two. things to learn as far as how then you know there are different methods of using, it different things you could use it for and we're gonna go around each. section and that looks ok so. now what we're going to do is go around and we're gonna make a selection and we're going to inverse the selection and now what we're gonna do is go back to. our mask and we're gonna go to white and we're just gonna brush it in back to normal and we're gonna also kind of this. might be a little bit too big of a brush. that was fun and we're gonna bring it.
the opacity down to about 38 and just. get rid of this just make it look pretty natural. well, that won't do anything because it's not so good but I. think this looks pretty good so now - well first what we'll do is we'll merge both like this make it one picture get. our comb stand tool makes it a little bit. big like this and just maybe not that way merge layers and we'll do this then. The easier way to use the lasso tool is just to fill in that extra sky. okay now that that has done that what we're gonna do is we're gonna puta color lookup layer and what that's also. gonna do it kind of gives the color.
a little bit more of an overall feel for the picture and that's that for now that that's good we go back into lightroom. I'm gonna get an I'm gonna get a small brush like this and just desaturate a. little bit just on the parts like here. you can bring the warm-up but we're going to just keep it desaturate just. like that now it kind of blends in a little bit more so now what we can do is bring our shadows up highlights down.
little bit. the contrast we're gonna bring clarity. haze lights up shadows now for this we. can do I want to take the Greens out of. there, first of all, this actually and. also, the other side for some reason did. it wants to that's fine
bring those whites up now we're gonna. but I'm gonna make our shadows part of a cooler and like so sharpening and. a little bit of noise reduction now because the background isn't perfect I'm gonna just bring the sharpness down. little bit so this way it's not too sharp it looks like then it's in the background as opposed to something. that sharpens in the foreground. like this, I'm going to do a graduate. filter like this bring the texture up. now the Sun looks like it's coming from this side so what I'm going to do is
create a radial filter like this and now we're going to duplicate it and.
bring it like this and we can bring it. that exposure down just a little bit. another cool little trick would be to.
sometimes what you can do is do this and then grab the brush grease and just get rid of it on the tires and it almost looks like a shadow if we. grab this again do the brush. I keep missing the edge of that tire which is perfect just like this and now. you have naturally lit you can even. bring it up the once a little bit I. think I'm gonna leave it probably like. this but also we're gonna bring the. oranges make it a little bit brighter. and also. I'll just bring them. saturation down a little bit nothing magenta purple. that seems like it's pretty good and. we'rebringing the color smoothness. can actually if we want we can even. bring this down just a little bit just MOR. to see how when you straighten it out a.little bit and there we go and there is. a full background change sound before.after and this is what before ours. editing so I know this was definitely. something that a lot of people were. wondering so I figured I would just make it. a quick video on how to do it I'll do. more videos regarding a background.change in the future but I. hope that this helped you understand
My company name is Touch Editing Fast. The company works on clipping paths, background removal, shadows, masks, and neck joints. The company has a good team like Clipping Path and Shadow Best.
a little bit about Photoshop and how to. Will use the pen tool to make your selection. you know as you can see right. along the edge of this is just perfect. Well, if you are for this video. Have any other suggestions or whatever you like.
Car shadow service