Cracked, broken or frost-damaged bricks are most effective replaced fully. But be sure that you understand what has brought on the damage prior to you try to repair it - it might be indicative of a severe challenge. Get additional data about block brick
Extensive cracking, one example is, may very well be due to subsidence which requires big attention. It's worth getting specialist suggestions on brick problems which extend over a substantial region, instead of trying to patch the damage. And in no way attempt to remove extra than about 10 bricks, considering that a big region of unsupported brickwork will want propping when you replace the broken bricks.
Replacing a smaller region of damaged bricks is just not a specifically tricky activity, but there are particular factors you'll have to keep in mind when doing this.
When you are dealing with a cavity wall, you must be cautious to not let any big pieces of brick or mortar fall in to the cavity; it may make a moisture bridge and result in problems with penetrating damp.
You will need to also make certain that the replacement bricks match the rest with the brickwork and that the pointing style is consistent with all the rest with the wall. In case your house is definitely an old one plus the brickwork is weathered, use second hand replacements in order that the new region doesn't look out of place. You'll be able to obtain old bricks pretty effortlessly from demolition sites or builders' yards, even though you might must eliminate the old mortar and clean them prior to they will be used.
You may need mortar for laying the bricks and pointing the joints. To get a modest amount of brickwork, it's generally easiest to purchase a bag of ready-mixed mortar. But be certain this really is the type for bricklaying.
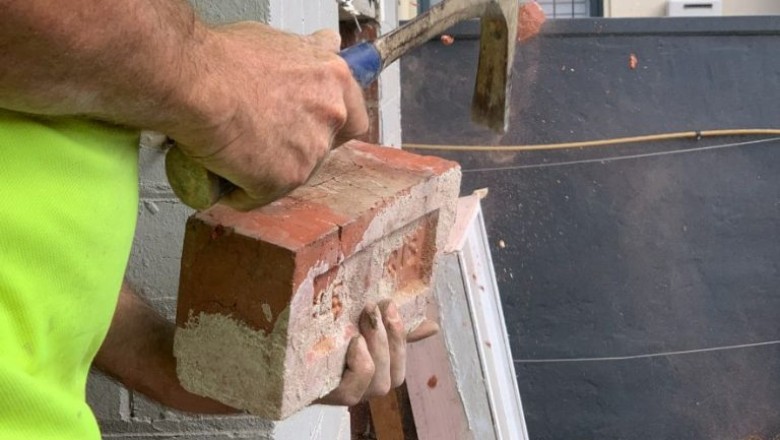
To take away a damaged brick, get started by drilling closely spaced holes into the mortar joints about the edge. You will need a masonry bit about 10mm in diameter and a strong electric drill - preferably one using a hammer action.
Chip away any remaining mortar using a bolster or thin cold chisel and club hammer. Run the chisel along every single side on the brick to work it free and clear of mortar.
It might be doable to lever the brick out in one piece, but if not, make use of the bolster to break it up. This makes it a lot less difficult to take away, but once more take care that pieces don't drop down the cavity by mistake.
If you have removed the first brick, it is actually considerably easier to prise out any others without having too much chipping. But for those who are coping with a strong wall built from two thicknesses of bricks they will still be held by the inner layer and the job is much less effortless. Within this case you'll have to break up the bricks using a chisel and club hammer.
Once all the broken bricks have been removed, clean up the surrounding mortar joints ready for laying the new bricks.
Following brushing away the loose debris, eliminate any stubborn mortar using a wire brush. Lastly, use a soft brush to have rid of all the dust and dirt. In the event the location is not cleaned out, you'll discover that the fresh mortar won't tie in adequately.
Dampen the surrounding bricks with water to quit them sucking the water out of the bricklaying mortar as well swiftly. Spread the dry mortar mix on a board and make a compact depression in it so you are able to gradually add water from the centre. Add dry mix from the outside until each of the water is absorbed. Repeat till you may have a firm but workable mortar mix.
Use a bricklaying trowel to pick up several of the fresh mortar and spread it along the base from the hole in the wall to a thickness of about 10mm.
Then slap a layer of mortar around the major and sides on the initially brick and spread it to a similar thickness as within the hole. Fit the first brick carefully into the wall, making certain that it truly is flush using the face. Press it firmly into location to ensure that the mortar holds it towards the adjacent bricks. Repeat the process until all bricks are in position.
This can be fairly difficult as you manoeuvre the final brick into location, so make certain there's loads of mortar in the gap and make use of the trowel handle to tap the brick into position. Take care to not drop any mortar down the cavity as you do so. You'll be able to use any remaining mortar to fill in massive gaps around the new bricks. Leave to get a few hours to harden.
Next, mix up some mortar for the pointing, and make very good all the mortar joints, pressing it in with the blade on the trowel. Make certain the pointing is consis¬tent with the rest on the wall.
When the mortar has pretty much dried, clean off any traces of mortar on the bricks by brushing hard with a wire brush.
If this fails to take away each of the debris, you'll be able to get special chemical brickwork cleaner. The solution is particularly corrosive for the skin, so take fantastic care when using it. Brush the solution on and wait until the effervescent action stops. Then wash it off with clean water. Lastly, clean up the complete location having a soft brush.
In the event the surrounding brickwork is fairly old, it might take some time for the new bricks to blend in, even if you have got managed to buy replacement bricks from a demolition yard. If this is the case, disguise the region by erecting trelliswork over it and planting some climbing plants.
Never enable the plants to attach themselves directly for the wall, nevertheless, for although they look desirable, they are able to lead to comprehensive damage if their roots are allowed to penetrate any loose spots inside the pointing.